
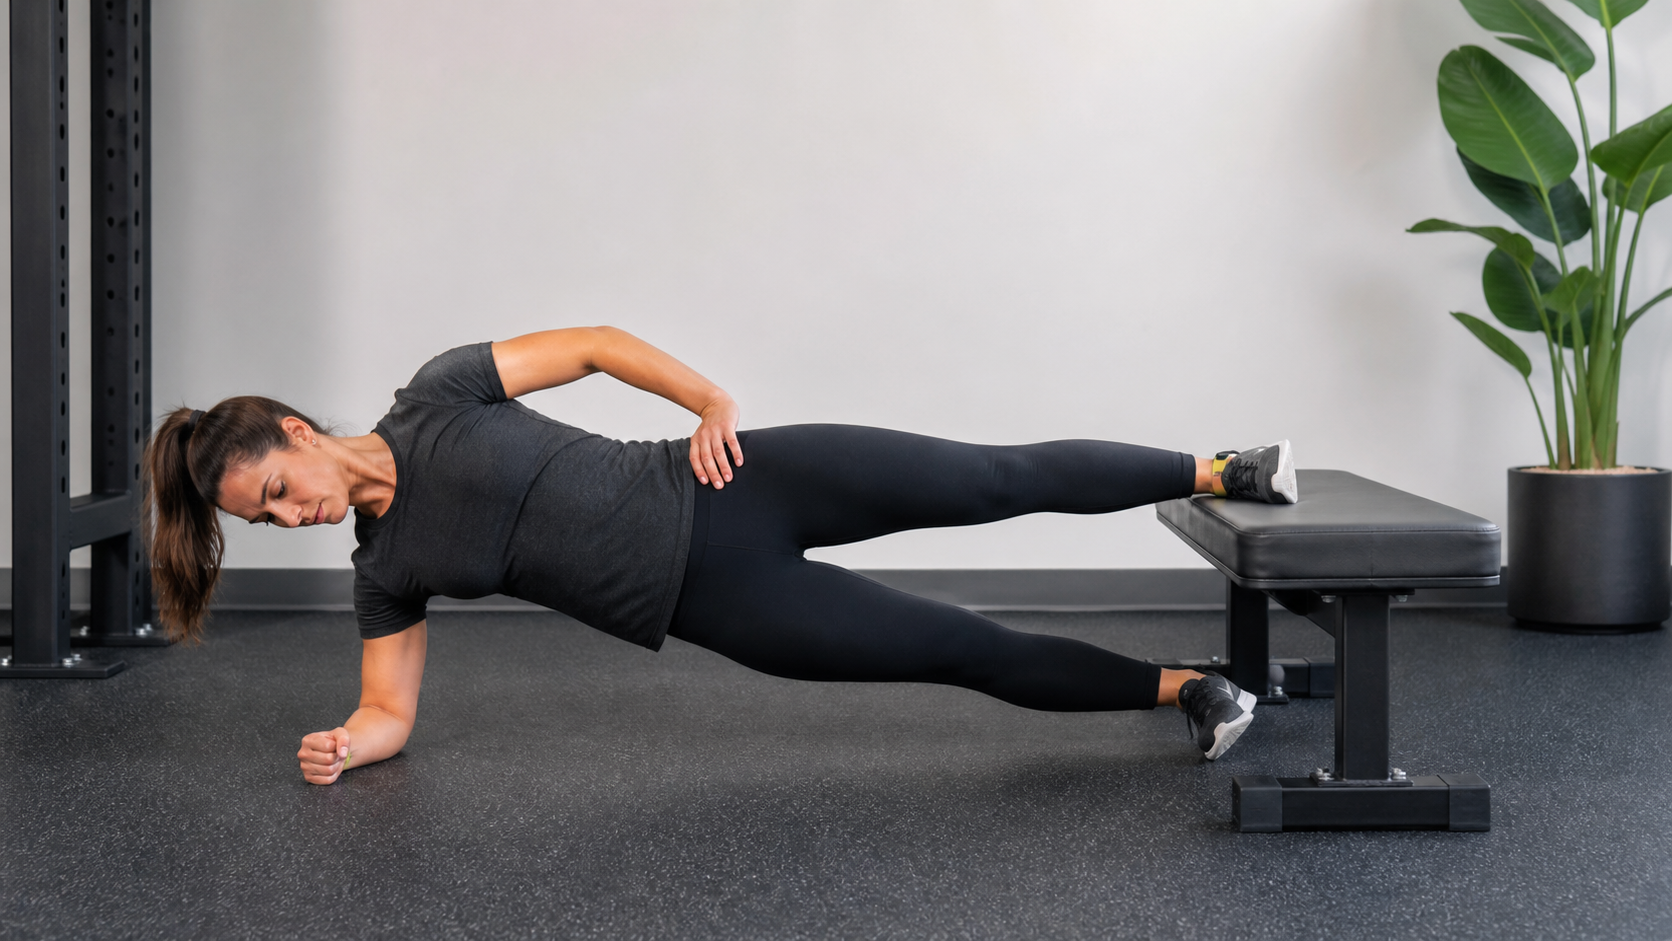
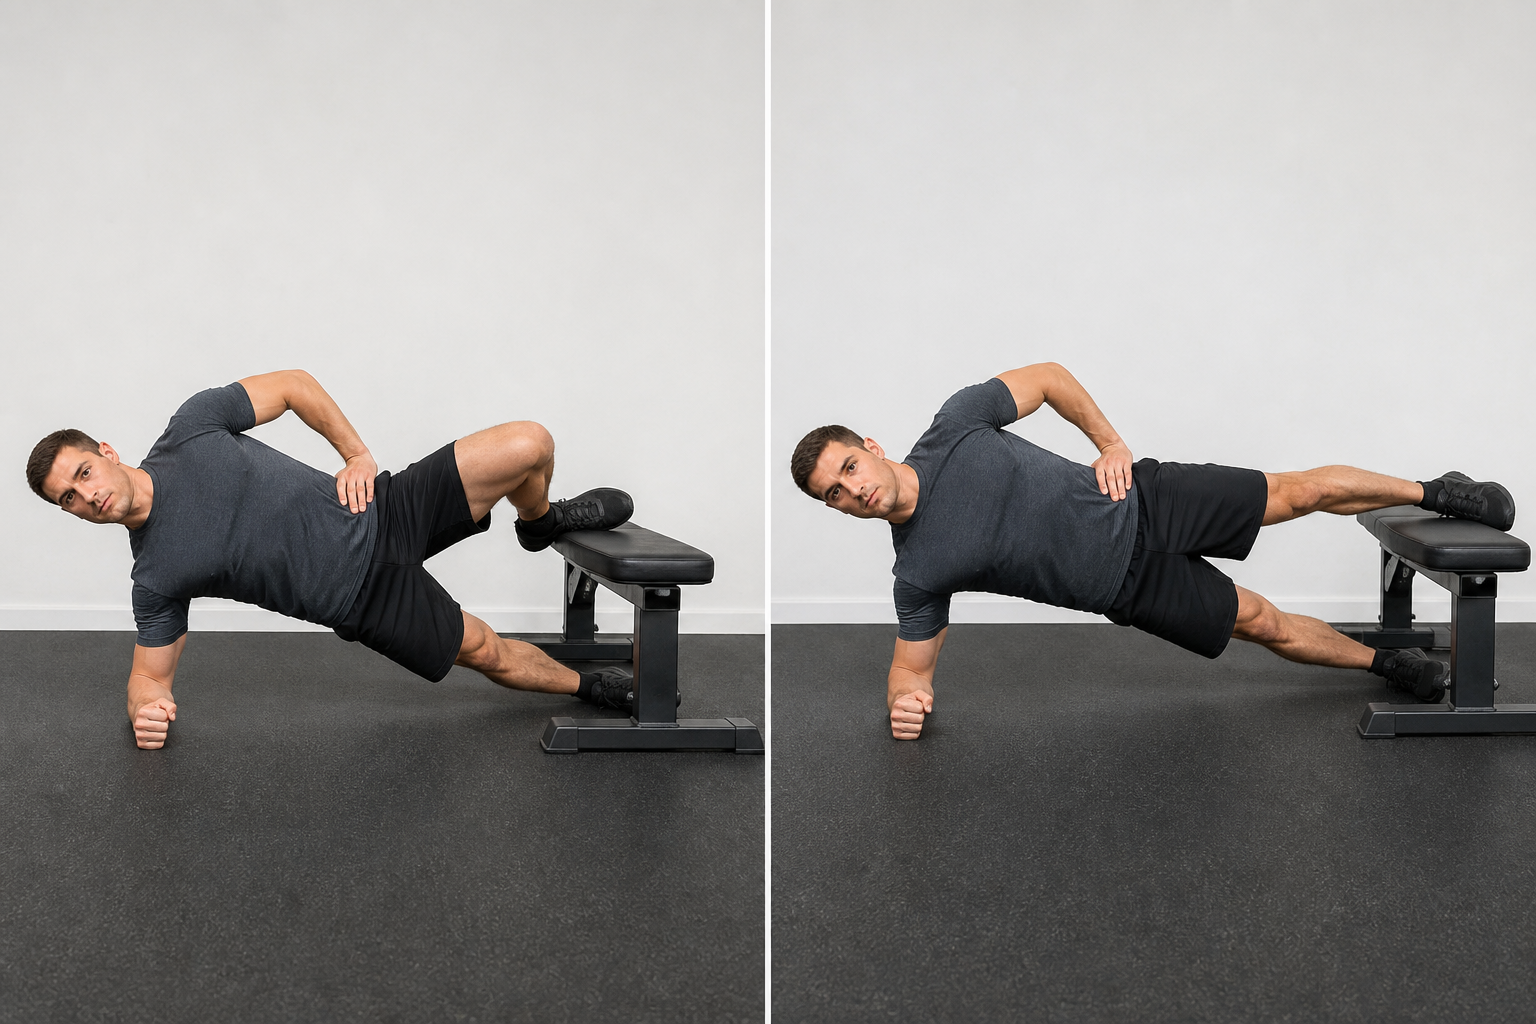
The Copenhagen plank looks like a side plank that joined a Scandinavian strength program and immediately became more demanding. Instead of supporting both legs, you place the top leg on a bench while the lower leg hangs below. That setup trains the inner-thigh muscles—especially the hip adductors—along with the trunk and shoulder.
The full version is challenging and can create significant soreness when introduced too quickly. Beginners should earn it through shorter-lever variations, low volume, and controlled technique. This guide shows every step.
Quick answer: Start with a bent-knee Copenhagen plank. Support the top knee on a padded bench, keep your body in a straight line, and hold for 10 to 20 seconds per side. Perform two sets once or twice weekly before attempting the straight-leg version.
What muscles does the Copenhagen plank work?
- Hip adductors: The inner-thigh muscles that pull the leg toward the body’s midline and help stabilize the pelvis.
- Obliques and deep trunk muscles: These resist the body sagging or rotating.
- Glute medius and other hip stabilizers: They help organize the pelvis and supporting hip.
- Shoulder stabilizers: The lower arm supports your upper body like a side plank.
A 2025 systematic review found that Copenhagen adduction programs can improve hip adduction and abduction strength. However, the review rated the underlying evidence very low quality and did not find a statistically significant reduction in seasonal groin injuries. In plain language: it is a useful strength exercise, not an injury-proof force field.
Equipment and setup
You need a stable bench, box, or firm chair that will not slide. Pad the support point with a folded mat or towel. The surface should be around knee height or lower while you learn. Clear the area beneath your hips and wear clothing that does not slide across the pad.
How to do a bent-knee Copenhagen plank
- Lie on your side with the bench beside your legs.
- Place the inside of your top knee and lower thigh on the padded bench.
- Set your lower elbow directly beneath your shoulder with your forearm on the floor.
- Bend the lower leg comfortably so it can remain off the ground.
- Brace your abdomen and squeeze the supported inner thigh.
- Lift your hips until your head, ribs, pelvis, and supported knee form a straight line.
- Hold for 10 to 20 seconds while breathing normally.
- Lower with control and repeat on the other side.
Keep the top knee pressing downward into the bench. Imagine lifting the underside of your waist away from the floor. If you feel sharp groin, hip, or shoulder pain, stop rather than attempting to negotiate with it.
How to do the full Copenhagen plank
- Lie on your side and place the inside edge of the top foot or lower leg on the bench.
- Stack your elbow beneath your shoulder.
- Straighten both legs and brace your trunk.
- Press the top leg into the bench as you lift your hips.
- Bring the lower leg toward the underside of the bench without twisting your pelvis.
- Hold briefly or perform controlled lower-leg repetitions.
- Lower slowly before changing sides.
The longer lever greatly increases demand on the adductors. Do not rush from a knee-supported hold to heroic 45-second foot-supported sets. Research on progressive Copenhagen programs shows that planned volume can build strength while limiting soreness.
Four Copenhagen plank progressions
| Level | Variation | Starting target | Move on when |
|---|---|---|---|
| 1 | Side-lying adductor squeeze into bench | 2 × 15 sec | No pain and steady pressure |
| 2 | Bent-knee Copenhagen hold | 2 × 10–20 sec | Hips stay level |
| 3 | Longer bent-knee or ankle-near-knee support | 2 × 15–25 sec | No next-day soreness affecting movement |
| 4 | Straight-leg Copenhagen hold | 2 × 8–15 sec | Controlled on both sides |
Progress by changing only one variable: lever length, hold time, repetitions, or sets. The body does not issue extra credit for changing all four before breakfast.
A beginner 4-week plan
| Week | Frequency | Prescription |
|---|---|---|
| 1 | 1 day | Bent-knee hold: 2 × 10 sec/side |
| 2 | 2 days | Bent-knee hold: 2 × 15 sec/side |
| 3 | 2 days | 2 × 20 sec/side or slightly longer lever |
| 4 | 2 days | 3 × 15–20 sec/side |
Allow at least 48 hours between sessions at first. Add the exercise after your general warm-up and before fatigue makes bracing sloppy. Use our 10-minute beginner gym warm-up to prepare for the session.
Common form mistakes
Letting the hips sag
A sagging pelvis shifts the challenge and usually signals that the variation is too hard. Shorten the lever, reduce the hold, and rebuild a straight line.
Rolling forward
Keep your chest and belt buckle facing forward rather than rotating toward the floor. Use a mirror or record one short set if you cannot feel the position.
Placing the elbow too far away
Stack the elbow under the shoulder. Reaching it outward increases shoulder stress without making the adductors more heroic.
Doing too much too soon
The inner thigh can become surprisingly sore after unfamiliar eccentric work. Begin with low volume and wait to see how you feel the next day before adding more.
Where to put it in a workout
Use the Copenhagen plank once or twice weekly after a warm-up. Athletes may place it in a lower-body preparation circuit. General gym users can add it after compound leg exercises or pair it with a glute exercise. Our beginner leg-day workout gives you a complete session to build around.
Copenhagen plank alternatives
- Adductor squeeze: Squeeze a ball or pad between the knees for an easier isometric option.
- Side-lying hip adduction: Lift the lower leg while lying on your side.
- Standing cable adduction: Move the working leg inward against cable resistance.
- Lateral lunge: Train the adductors dynamically while also involving the hips and legs.
Choose the variation you can perform without pain and progress. There is no exercise loyalty program; alternatives still count.
Frequently asked questions
How long should I hold a Copenhagen plank?
Beginners can start with 10 to 20 seconds per side. Longer is not automatically better if the hips sag or the body rotates.
Should I feel it in the groin?
Muscular effort along the inner thigh is expected. Sharp, pinching, or sudden groin pain is not. Stop and seek qualified assessment if symptoms persist.
Can Copenhagen planks prevent groin injuries?
They can strengthen the adductors, but current review evidence does not prove that the exercise alone prevents groin injuries. Training load, sport exposure, previous injury, recovery, and a broader strength program also matter.
The bottom line
The Copenhagen plank is an efficient but advanced inner-thigh and trunk exercise. Begin with knee support, use short holds, and progress only when your hips stay level and soreness remains manageable. Technique first; Viking soundtrack optional.
Sources: 2025 systematic review and meta-analysis; progressive Copenhagen program study.
Keep learning: beginner balance and core routine and dead-bug exercise guide offer practical next steps on this topic.
Leave a Reply